When delving into the world of vaping, one key topic that arises is how to prime a vape coil to avoid burning. Properly priming a coil can significantly enhance your vaping experience. This process ensures that the coil is well-prepared to deliver smooth and flavorful vapor. A dry or improperly primed coil not only affects taste but can also lead to unpleasant burning issues.
Many new vapers may overlook priming. This oversight can result in a harsh throat hit and diminished cloud production. Without adequate saturation, the cotton within the coil cannot absorb e-liquid, risking damage. Thus, understanding how to prime a vape coil to avoid burning is essential for enjoying your device's full potential. A few simple steps can lead to a vastly improved vaping experience, making it both enjoyable and satisfying.
By giving attention to the details of this process, you can prevent burning issues and extend the life of your coil. Experience and knowledge in this area can boost your confidence as a vaper. Ultimately, mastering this technique contributes to a reliable and pleasurable vaping journey.
Priming a vape coil is essential for optimal performance. It ensures that the coil is saturated with e-liquid before use. Inadequate priming can lead to burning issues, impacting flavor and enjoyment. A study by Vape Research Institute indicates that nearly 30% of vapers experience burnt taste as a consequence of improper priming.
Understanding the importance of this process can prevent dissatisfaction. The coil's wick requires time to absorb e-liquid. Without this, the coil can overheat, resulting in a dry hit. A survey found that 40% of vapers admitted to rushing the priming process, leading to negative experiences. Vapers should wait a few minutes after filling the tank before taking their first puff. This simple practice can vastly improve the vaping experience.
Additionally, using a higher VG (vegetable glycerin) content e-liquid requires more priming time. VG is thicker and takes longer to saturate the wick. A report suggests that vapers using e-liquids with over 70% VG should double the priming time. Observing these factors can help reduce the risk of burning coils and enhance overall satisfaction. Even experienced vapers must remain vigilant; complacency can lead to errors in this crucial step.
| Step | Description | Importance |
|---|---|---|
| 1 | Remove and inspect the coil | Ensures no damage or residue is present. |
| 2 | Apply e-liquid directly to the coil | Saturates the wick to prevent dry hits. |
| 3 | Let the coil sit for a few minutes | Allows the wick to fully absorb the e-liquid. |
| 4 | Reassemble the vape device | Prepares the device for use with the primed coil. |
| 5 | Start at a lower wattage setting | Prevents burning the wick before it’s fully saturated. |
| 6 | Gradually increase wattage if needed | Finds optimal settings without causing burning issues. |
: Priming saturates the coil, preventing burning and enhancing flavor.
Watch for a harsh taste, reduced vapor, or strange odors.
Rushing can lead to burnt taste and less enjoyable vaping experiences.
Allow a few minutes for the wick to absorb e-liquid. Double the time for high VG liquids.
Frequent dry hits or a very burnt flavor indicate the need for replacement.
Taking primer puffs can help draw e-liquid in, but only if done correctly.
Let it sit for about 10 minutes to ensure proper saturation.
Yes, use lower wattage initially to avoid burning during coil break-in.
Regularly check for signs of a dry coil and replace it when necessary.
It's best to use e-liquids that match your coil recommendations for optimal performance.
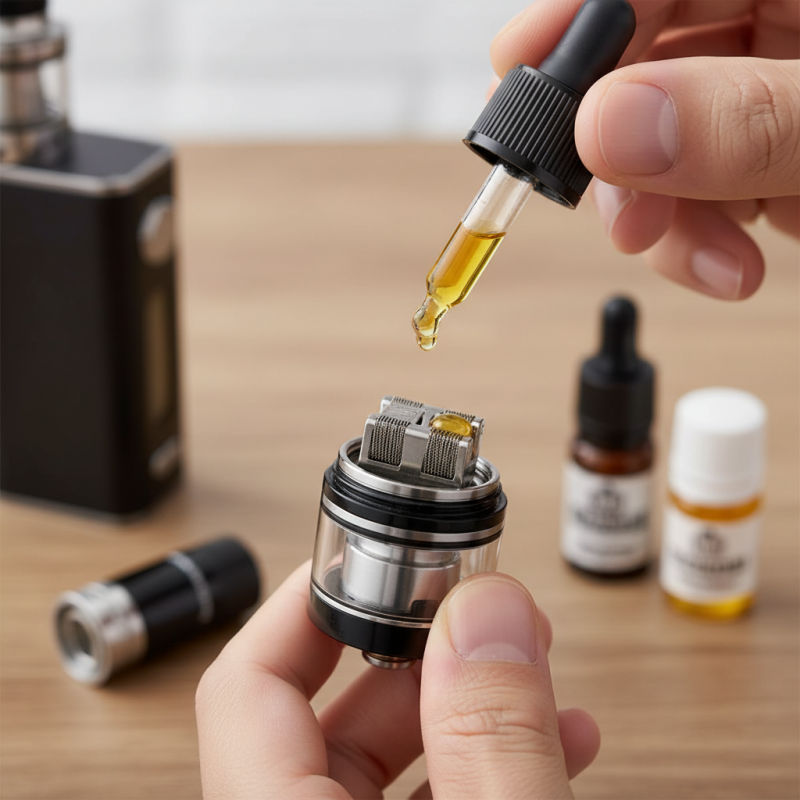
Priming a vape coil is crucial to prevent burning issues, which can ruin your vaping experience. To understand how to prime a vape coil to avoid burning, it's important first to recognize the signs of a dry coil, such as a burnt taste or reduced vapor production. Properly saturating the wick with e-liquid before use ensures optimal performance.
A step-by-step guide for priming includes adding a few drops of e-liquid directly onto the coil, allowing it to soak for several minutes, and then assembling the vape. Best practices for maintaining your coil involve regular cleaning and timely replacements to enhance lifespan and flavor. Additionally, avoiding common mistakes, such as over-wicking or not letting the coil sit long enough, can significantly improve your vaping experience and prevent harmful burning issues.